Mastering the art of the fade is the ultimate rite of passage for anyone interested in men’s grooming. Whether you want to save money on monthly barber visits or you simply enjoy the precision of a sharp cut, learning how do i do a fade haircut at home is a skill that pays dividends. In 2026, the tools available to the home barber are more advanced than ever, making professional-grade results and a truly professional finish more accessible.
A fade is defined by the smooth, seamless transition between hair lengths, moving from shorter hair at the neckline to longer hair at the crown. While it may look intimidating, the process is rooted in geometry and patience. If you follow a methodical, step-by-step approach, you can achieve a clean, modern look that rivals any high-end salon, truly understanding how do i do a fade haircut effectively.
Essential Tools for the Perfect Fade
Before you pick up your clippers and begin to understand how do i do a fade haircut, you need to ensure you have the right arsenal. A professional fade requires more than just a pair of clippers; it requires precision instruments. For the closest cuts, some even opt for zero-gapped clippers.
Professional Cordless Clippers: Look for models with a high-torque motor and adjustable levers.
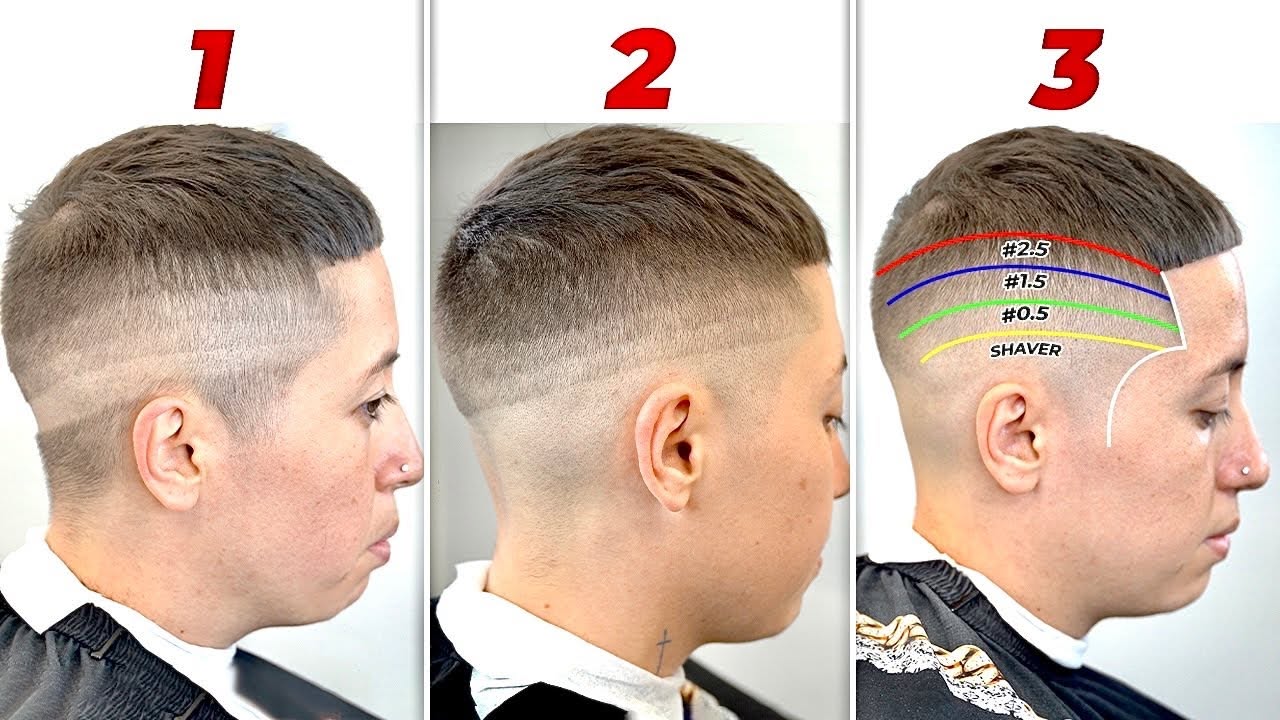
A Set of Guard Combs: You will typically need guards ranging from #0.5 to #4.
Blending Shears: These are essential for thinning out the top and removing “bulk” without creating harsh lines.
A High-Quality Mirror Setup: A three-way mirror is crucial for seeing the back of your head clearly.
A Barber’s Comb and Spray Bottle: Keeping hair damp (or dry, depending on your preference) and combed straight helps maintain consistency.
Investing in high-quality tools is the first step toward success. Statistics show that 75% of home haircut mistakes are caused by using dull blades or incorrect guard sizes. Ensure your blades are oiled and sharp before starting.
Step 1: Preparation and Determining the Fade Height
The first step in understanding how do i do a fade haircut is deciding which type of fade you want, considering your client’s head shape and hair texture. A low fade starts just above the ears, a mid fade sits halfway up the sides, and a high fade begins near the temples. Other popular variations include the taper fade and the modern drop fade.
Once you’ve chosen your style, start by trimming the hair on top to your desired length using styling scissors or a long guard. This acts as your “anchor” length. Always cut less than you think you need; you can always go shorter, but you can’t add hair back.
Step 2: Establishing the Baseline
This is the most critical stage when learning how do i do a fade haircut. With your clipper lever open (or using a #0.5 guard), create a horizontal line around the head where you want the fade to begin. This initial guideline is your “zero” point.
Everything below this line will be taken down to the skin or the shortest setting. Use the clippers in a flicking motion—this is the secret to a smooth fade. Instead of dragging the clippers straight up, flick your wrist away from the head as you reach the top of your stroke to avoid creating a harsh, “choppy” line.
Step 3: The Art of Blending (The “Transition” Phase)
Blending is where the magic happens, and mastering various blending techniques is key to understanding how do i do a fade haircut with professional results. You need to transition from the shortest point to the longest point by working through your guard sizes systematically.
- Start with the next guard up: If you started with a #0.5, switch to a #1. Go up about an inch higher than your previous line.
- Use the lever: If your clippers have a lever, use it to adjust the blade length between guards. This allows you to create “half-sizes,” which are the key to seamless blending.
- Vertical Strokes: Always cut in vertical strokes, moving from the neck toward the crown. This ensures that you aren’t leaving patches of uneven hair.
- Check for “Lines of Demarcation”: If you see a visible line between two lengths, use the corner of your blade or a smaller guard to gently “flick” away the weight at that specific junction.

Step 4: Refining and Detailing
Once the main fade is established, and you’ve mastered the initial steps of how do i do a fade haircut, it’s time to clean up the edges. A sharp neckline and temple alignment can make a decent haircut look like a professional masterpiece. For areas needing more subtle refinement, especially on the top or where the fade meets longer hair, employing the clipper over comb technique can help achieve a seamless transition without creating new lines.
Use a detailer or a trimmer to create crisp lines around the ears and the back of the neck. If you are comfortable with a straight razor, you can clean up the skin area for a “skin fade” effect, but be careful—this requires a steady hand and a light touch to avoid nicks.
Finally, use your blending shears to soften any areas that look too thick. Thinning shears are your best friend for correcting minor errors without removing large chunks of hair. If you find a dark spot, take a small amount of hair off with the thinning shears and re-comb.
Pro Tips for 2026 Home Barbers
Technology has made it easier to learn how do i do a fade haircut, but technique remains king. Here are a few expert secrets for the modern home barber:
Slow Down: The biggest mistake beginners make is rushing the process. A professional fade takes anywhere from 30 to 60 minutes.
Clean Your Blades: Hair buildup can cause the clippers to drag or pull. Stop every 5 minutes to brush off excess hair and re-oil the blades.
Lighting is Everything: Ensure you have bright, overhead lighting. Shadows are the enemy when you are trying to blend.
Practice on Mannequins or Friends: If you are nervous, practice on a willing friend or a mannequin head before trying it on yourself.
Use a Fade Guide: In 2026, there are many AR-based apps that can help you visualize where your lines should be based on your head shape. Understanding hair growth patterns is also crucial to avoid irritation and achieve a cleaner cut.
Troubleshooting Common Fade Problems
Even the pros encounter issues when trying to perfect how do i do a fade haircut. If you notice a “step” or a line that won’t go away, don’t panic. Take a smaller guard, close the lever, and gently work at the base of the line. Often, the issue isn’t that the hair is too long, but that the hair is lying flat. Comb the hair in the opposite direction of growth to help it stand up, then pass the clippers over it again.
If you accidentally go too high with a guard, you have two options: fade the rest of the head to match that higher point, or accept it as a “high fade” and blend it accordingly. Remember, the fade is a forgiving style if you are willing to keep blending until the transitions are smooth.
Conclusion: Practice Makes Perfect
Learning how do i do a fade haircut is a journey of trial and error. By 2026, the stigma of “home haircuts” has vanished, replaced by a culture of self-reliance and personal grooming mastery. You might not get it perfect on your first try, and that is perfectly fine. The beauty of hair is that it grows back, giving you another opportunity to refine your technique.
Start with a simple low fade, focus on your flicking motion, and never underestimate the importance of good lighting and high-quality tools. With patience, persistence, and these steps, you will be well on your way to becoming your own personal barber and truly understanding how do i do a fade haircut like a pro. Keep experimenting, keep learning, and enjoy the confidence that comes with a fresh, sharp look.