The fade haircut remains the gold standard for men’s grooming in 2026. Whether you are looking for a sharp, professional look or a trendy, modern aesthetic, mastering the fade is an essential skill. While it may seem intimidating to pick up clippers for the first time, learning how to give a fade haircut is a highly achievable goal with the right technique, patience, and tools.
A fade is essentially a gradient effect where the hair transitions from short to long as it moves up the head. In this guide, we will break down the process into manageable steps, ensuring you can achieve a salon-quality result at home.
Essential Tools for the Perfect Fade
Before you start, you need the right arsenal. Using professional-grade equipment makes the process smoother and the results much cleaner. In 2026, cordless clippers have become the industry standard, offering better maneuverability for beginners.
Professional Cordless Clippers: Look for models with an adjustable lever.
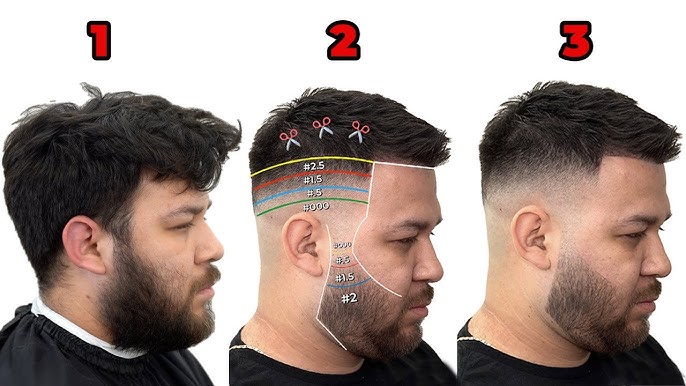
A Set of Guard Attachments: Typically ranging from #0 (no guard) to #4 or #5.
A High-Quality Barber Comb: Essential for sectioning and blending.
A Mirror Setup: A three-way mirror is ideal if you are fading your own hair.
Clippers Oil and Cleaning Brush: Maintenance is key to preventing “pulling” during the cut.
Step 1: Establishing Your Guideline
The secret to a great fade is the guideline. This is the initial line you carve into the hair that determines where the shortest part of the fade begins.
Start by deciding on the type of fade you want: low, mid, or high. For beginners, a mid-fade is often the most forgiving. Use your clippers without a guard (or with a #0.5 guard) to create a crisp, horizontal line around the head, usually just above the ears and the nape of the neck. Ensure this line is symmetrical on both sides; taking your time here prevents uneven results later.
Step 2: The Blending Process (The “Flick-Out” Technique)
Once your base guideline is set, it is time to blend. The “flick-out” technique is the secret weapon of professional barbers. Instead of pushing the clippers straight up into the hair, you want to flick your wrist outward as you reach the top of the section you are working on.
This motion prevents harsh lines and creates that soft, blurred transition that defines a high-quality fade. Start with a #1 guard and work your way up to a #2, moving about half an inch higher with each guard change. Always move in a consistent, upward motion, and never rush the process.
Step 3: Mastering the Transition Zones
The transition zone is where most beginners struggle. This is the area between two different hair lengths where a visible “line” might appear. To erase these lines, use the lever-adjustment technique.
If you have a visible line between your #1 and #2 sections, set your clipper lever to the middle position (between closed and open). Gently glide the clippers over the line using the corner of the blade. This “softens” the transition. Repeat this process with the lever fully open if necessary. Remember, less is more—you can always remove more hair, but you cannot put it back.
Understanding Different Fade Types
In 2026, the variety of fade styles has exploded. Understanding these types will help you decide which look fits your face shape or hair texture best:
The Skin Fade: The hair is buzzed down to the skin at the base. It is the boldest, most high-maintenance look.
The Drop Fade: The fade line drops behind the ear, following the natural curve of the skull. This is excellent for creating a more personalized silhouette.
The Burst Fade: Often used for mohawks or mullets, the fade “bursts” in a semi-circle around the ear.
The Taper Fade: A more subtle version, where the fade is concentrated only on the sideburns and the nape of the neck.
Pro Tips for Maintenance and Longevity
To keep your fade looking sharp for more than a few days, you need to understand hair growth cycles. On average, hair grows about 0.5 inches per month. A fresh fade usually looks its best for about 7 to 10 days.
Clean the Neckline: Use a dedicated trimmer or a straight razor to clean up the hair on the neck. A sharp, clean neckline is 50% of the battle.
Check for “Holes”: Use a hand mirror to check the back of your head. If you find a patch where the hair is too short, do not try to “fix” it by cutting the rest shorter—simply accept it as a learning point for next time.
Use Quality Product: A matte pomade or a light texturizing powder can help hide minor blending imperfections while giving the hair a professional finish.
Common Mistakes to Avoid
When learning how to give a fade haircut, avoid these common pitfalls:
- Cutting Too High: Starting your fade too high can make the hair look thin or patchy. Start lower; you can always move up.
- Ignoring Head Shape: Everyone’s skull is shaped differently. Feel for bumps and indentations, and adjust your clipper pressure accordingly.
- Using Dirty Clippers: Hair trapped in the blades can cause the clippers to drag, leading to an uneven cut. Clean your gear after every few passes.
Troubleshooting Your Fade
If you finish your cut and realize the lines are still visible, don’t panic. This is known as “ghost lines.” These often appear because you didn’t overlap your clipper strokes enough. Go back with a slightly higher guard and work slowly over the line again.
If you find yourself stuck, take a break. Sometimes, walking away for ten minutes allows you to return with “fresh eyes” to see exactly where the blending went wrong. Remember, even professional barbers spend years perfecting their craft. Your first attempt at an at-home fade is a milestone, not a final exam.
Conclusion: The Path to Mastery
Learning how to give a fade haircut is a journey of practice and precision. By following these steps—establishing your guideline, using the flick-out technique, and carefully managing your transition zones—you can achieve professional results in your own bathroom.
As we move further into 2026, the trend toward personalized, DIY grooming continues to grow. Don’t be afraid to experiment with different guard lengths or fade heights to find what works for you. With enough practice, you will no longer need to rely on expensive salon appointments, saving both time and money while keeping your style sharp and modern.
Exploring the Nuances of Fade Styles: Beyond the Basic Blend
While the fundamental principles of fading remain consistent, the world of fade haircuts offers a rich tapestry of styles, each with its own character and impact. Understanding these variations is key to personalizing your look and mastering the art of the fade.
The Low Fade: Subtle Elegance and Professional Polish
A low fade begins its taper just above the ear and follows the natural hairline around the nape of the neck. It offers a more conservative and subtle transition, making it an excellent choice for professional settings or for those new to fades who prefer a less dramatic contrast. To achieve a low fade, your initial guideline (e.g., using a #0 or #1 guard) should be drawn lower on the head, typically no higher than the top of the earlobe. The blending process then focuses on a smaller, more concentrated area, demanding precision but resulting in a sophisticated, understated look that complements most face shapes.
The Mid Fade: The Versatile Classic
Often considered the most popular and versatile option, the mid fade starts its taper between the temple and the ear, usually around the midpoint of the head. This style strikes a perfect balance between the subtlety of a low fade and the boldness of a high fade, offering significant contrast without being overly dramatic. Its adaptability makes it suitable for a wide range of hair textures and lengths on top, from textured crops to slick backs. When executing a mid fade, your first guideline will be positioned centrally, requiring careful attention to ensure symmetry on both sides of the head. This height provides ample space for smooth transitions across multiple guard lengths, making it an excellent style for further developing your blending skills.
The High Fade: Bold Statement and Maximum Contrast
For those seeking a more assertive and striking look, the high fade is the ultimate choice. This style starts its taper high on the sides of the head, often above the temples and extending almost to the crown. It creates a dramatic contrast between the very short sides and the longer hair on top, drawing attention to the top styling. High fades are particularly popular with modern, edgy hairstyles like pompadours, quiffs, or textured crops. When attempting a high fade, be prepared for a bolder initial guideline. The blending zone is narrower, meaning each step in guard length needs to be executed with even greater precision and shorter flicking motions to avoid harsh lines. This style can be particularly flattering for those with rounder face shapes, as the height on the sides can elongate the face.
The Skin Fade (or Bald Fade): The Ultimate Contrast
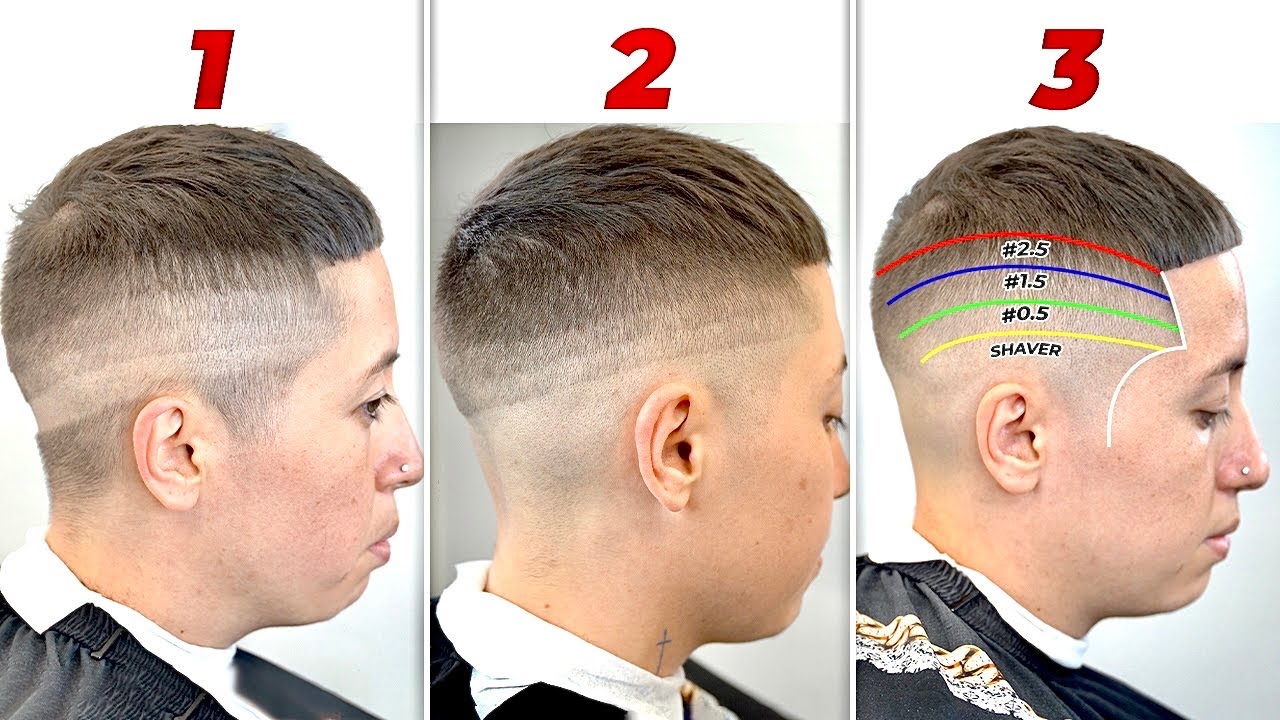
The skin fade takes the concept of contrast to its extreme, transitioning from completely bald skin at the bottom to longer hair on top. This style is incredibly sharp and clean, offering a truly striking aesthetic. Achieving a skin fade requires not only clippers but also a foil shaver or straight razor for the closest possible cut at the base. The process begins by shaving the lowest section completely bald, then gradually building up the fade from a “no guard” or “open lever” setting, meticulously blending through 0.5, 1, 1.5, and higher guards. This type of fade demands meticulous attention to detail and patience, as any imperfection will be highly visible.
The Drop Fade: Following the Contours
A drop fade is a variation where the fade line “drops” down slightly behind the ear, following the natural curve of the head before reaching the nape. This creates a softer, more natural transition around the ear and neck, distinguishing it from a standard straight-line fade. It can be applied to low, mid, or high fade styles, adding an extra layer of sophistication and a more organic flow to the haircut. When performing a drop fade, you’ll need to be mindful of the ear’s shape and adjust your cutting line accordingly, ensuring a smooth, downward curve rather than a straight horizontal path.
Refining Your Technique: Advanced Clipper Control and Precision
Beyond simply knowing what guards to use, mastering the subtle art of clipper control is what truly elevates a fade from amateur to professional.
The Art of Lever Play: Micro-Adjustments for Seamless Blends
Your clipper’s lever is an often-underestimated tool for achieving truly seamless blends. When the lever is fully closed, the blade cuts at its shortest setting for that guard (e.g., a #1 guard closed is a true #1). When fully open, it cuts slightly longer (e.g., a #1 guard open is closer to a #1.5). The magic happens in the incremental adjustments.
Opening the Lever: As you move up a section, after cutting with a closed guard (e.g., #0.5 closed), open the lever slightly and use a flicking motion just above your previous guideline. This creates an intermediate length that helps soften the line before you switch to the next full guard length (e.g., #1 closed).
Closing the Lever Gradually: If you encounter a stubborn line, try using the next smallest guard with the lever fully open, then gradually closing it as you work your way down into the problem area with light, scooping motions. This technique allows for minute adjustments, shaving off tiny fractions of hair at a time, effectively “erasing” lines.
C-Scooping and Flicking: The Secret to Smooth Transitions
These are fundamental motions for blending.
C-Scooping: This involves moving the clipper in an upward, C-shaped motion, scooping away from the head as you reach the desired height of your blend. This prevents creating a harsh line at the top of your section. It’s particularly useful when transitioning from a shorter guard to a longer one, allowing the hair to gradually increase in length.
Flicking Out: As you approach the top of each section, instead of pressing the clipper flat against the head, “flick” the clipper outwards. This ensures that only the very tips of the hair are cut, creating a soft, feathered edge that blends effortlessly into the next, longer section. Consistent, light flicking is paramount to avoiding hard lines.
Clipper-Over-Comb: Blending Longer Hair with Precision
For blending the fade into longer hair on top, or for removing bulk where guards are no longer effective, the clipper-over-comb technique is invaluable.
- Sectioning: Use a fine-tooth comb to lift a small section of hair away from the scalp.
- Angle: Hold the comb at the desired angle for your blend. The closer to the scalp the comb is, the shorter the cut.
- Cutting: Glide your clipper over the comb, cutting only the hair that protrudes above the comb’s teeth.
This technique offers unparalleled control, allowing you to gradually reduce bulk and create a seamless connection between the faded sides and the longer top. It’s also excellent for refining the perimeter of the fade.
Detailing with Trimmers and Shavers: Achieving Crisp Lines and Zero-Gaps
Trimmers: These are essential for creating sharp, clean outlines around the ears, sideburns, and the nape of the neck. Use the corner of the trimmer blade for precision work, carefully defining the perimeter of your haircut. Trimmers are also perfect for cleaning up any stray hairs that the clippers might have missed.
Foil Shavers (or Electric Shavers): For a true skin fade, a foil shaver is used after the initial bald section has been created with a “no guard” clipper. It provides an even closer shave than clippers, achieving a baby-smooth finish at the very bottom of the fade. Always use a shaver on dry, clean skin for the best results and to prevent irritation.
Pre-Cut Preparation and Post-Cut Perfection
The success of your fade isn’t just about the cutting; it’s also about what happens before and after.
Optimal Hair Preparation: Setting the Stage for Success
Before even picking up your clippers, ensure the hair is clean and dry. Oily or product-laden hair can clog clipper blades, leading to uneven cuts and pulling. Dry hair allows for a more consistent and accurate cut, as wet hair can appear longer than it actually is. Combing the hair thoroughly in its natural growth direction before starting will also help identify any cowlicks or growth patterns that might require special attention.
Finishing Touches: Edging, Necklines, and Styling
Once the fade is complete, use your trimmer to refine the edges. Create a crisp, straight or slightly rounded neckline at the back, ensuring it’s symmetrical. Define the sideburns according to your desired style – sharp lines, tapered, or faded out. Finally, apply a small amount of styling product (pomade, wax, or cream) to the longer hair on top to enhance texture and hold, completing your polished look.
Maintaining Your Masterpiece: Fade Longevity and Routine Care
A sharp fade requires regular maintenance. Depending on how quickly your hair grows and how short you go, you might need a touch-up every 1-3 weeks. The shortest parts of the fade will grow out fastest, making the blend less defined. To extend the life of your fade, consider doing a quick “fade clean-up” between full haircuts, focusing only on re-fading the very bottom sections and re-lining the edges. Regularly clean and oil your clipper blades to ensure they remain sharp and hygienic.
Troubleshooting and Overcoming Common Challenges
Even experienced barbers encounter challenges. Knowing how to troubleshoot common issues will save you frustration and improve your results.
Addressing the Dreaded “Lines”: How to Blend Away Imperfections
The most common issue for beginners is visible “lines” between guard lengths.
Solution 1: Smaller Guard, Open Lever: If you see a line between, say, the #1 and #2 guard sections, go back to the #1 guard, but open its lever completely. Use gentle, flicking motions directly on the line, barely touching the hair. This will cut at an intermediate length, softening the transition.
Solution 2: Half-Guard Technique: Many clippers come with 0.5 or 1.5 guards. These are specifically designed to bridge the gap between full guard sizes. If you don’t have them, the lever play technique mimics their function.
Solution 3: Clipper-Over-Comb: For stubborn lines in longer sections, use the clipper-over-comb method to carefully “chip away” at the line until it disappears.
Ensuring Symmetry: Tips for a Balanced Look
Achieving perfect symmetry, especially when cutting your own hair, can be tricky.
Two-Mirror Technique: Use a large wall mirror and a smaller handheld mirror. Position yourself so you can see the back and sides from multiple angles.
Frequent Checks: Step back often and examine your work from a distance and different angles. Compare both sides of the head regularly.
Reference Points: Use natural reference points like the top of the ear, the temple, or the eyebrow line to ensure your fade lines start and end at the same height on both sides.
Patience: Don’t rush. Take your time to make small adjustments, constantly checking for balance.
Navigating Tricky Hair Patterns: Cowlicks and Growth Directions
Hair doesn’t always grow uniformly. Cowlicks (whorls) and areas where hair grows in different directions can create challenges.
Cut Against the Grain: When fading, always cut against the direction of hair growth for the most even cut. However, around cowlicks, you might need to try cutting in multiple directions to catch all the hairs.
Adjust Guard Lengths: Sometimes, a cowlick might require a slightly longer guard length to avoid cutting it too short and making it stand up.
Feathering: Around tricky areas, use extra light, flicking motions to blend, rather than pressing the clipper flat against the head.
The Evolving World of DIY Grooming: A Look Ahead
The landscape of personal grooming is continually evolving, with a significant shift towards empowerment through DIY techniques. Data from market research firms indicates a consistent year-over-year growth in the at-home grooming products sector, with a projected compound annual growth rate (CAGR) of over 6% through 2028. This trend is fueled by innovations in user-friendly tools, accessible online tutorials, and a desire for greater personalization and cost savings.
Mastering the fade haircut at home is more than just a practical skill; it’s an investment in self-reliance and a testament to your commitment to personal presentation. Each successful cut builds confidence, not just in your grooming abilities, but in your capacity to learn and execute complex tasks. As you continue to practice, you’ll develop an intuitive understanding of hair texture, growth patterns, and clipper mechanics that will serve you well for a lifetime. Embrace the journey, celebrate your progress, and remember that every haircut is an opportunity to refine your craft. The independence and satisfaction of achieving a salon-quality fade in your own home are truly invaluable, positioning you at the forefront of modern, self-sufficient grooming.